
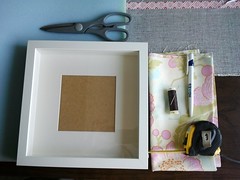
To make it you'll need:
- Upholstery foam, half an inch thick (got mine on ebay - about 1.50 for a metre)
- A box photo frame (this one is a 'Ribba' from Ikea)
- Half a metre of fabric (I used Amy Butler's Fresh Poppies from the Midwest Modern collection)
- Needle and thread, scissors and pen or chalk
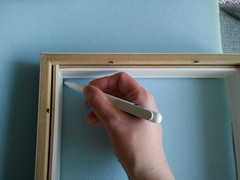
1) Measure and cut a long section of foam - the same width as the inside of the box frame (just draw along the inside of the box). Make it quite long, as you're going to fold it up into a concertina shape.
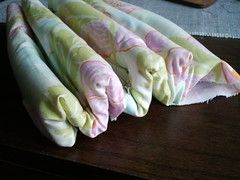
2) Lay the foam onto the back of the fabric and fold up the edges. Tack the fabric in place on the back of the foam - this'll keep it all in place when you fold it up.
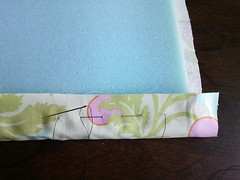
3) You're going to make a concertina shape with the covered foam. The folds need to be the same width as the depth of your box frame so check how deep it is (mine was 2 inches). Stich along the bottom of the folds to keep them in place - it doesn't have to be particularly neat as the stitches won't show on the finished piece.

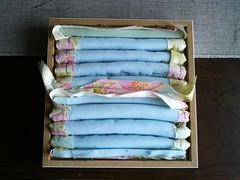
4) Working along the length of the foam, you'll have something that looks like this:
5) Fit the foam into the box frame - it should fit quite snuggly. I needed to do the foam bit in two sections, which you can see from the back, but not on the front - seamless!
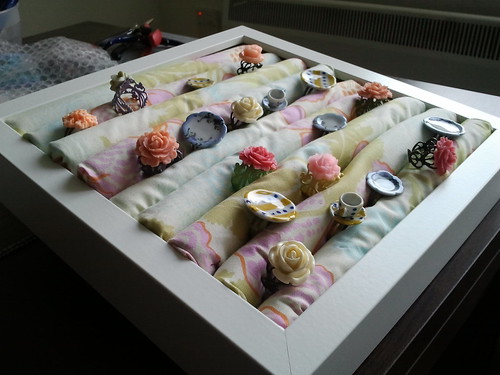
Finished ring holder - ta-daaah!

You can see the ring holder beign put to excellent use at Wonder Hill High Craft Market yesterday over on my Facebook page.
Wow! This is a fantastic 'how-to': what a great idea. It's so pretty as well. I think I might have to start wearing rings, just so that I have the excuse to make one of these...
ReplyDeleteOoh make one, make one! Realised you can personalise it - different frame size, get a wooden one and paint it, use different fabrics, velvet - possibilities are endless!
ReplyDeleteThis is a brilliant idea - I'll have to boost my collections of rings so I have an excuse to try this tutorial :D x
ReplyDeleteUhooi,,
ReplyDeleteWow,, It's a good idea and the creative,,
Uhooi.blogspot.com
Looks awesome! Very creative, plus I will take any excuse to make a "quick trip to IKEA" ;)
ReplyDelete